Creating an orbit animation
|
Command |
Path |
|
Create Orbit Path |
Model > Create Animation |
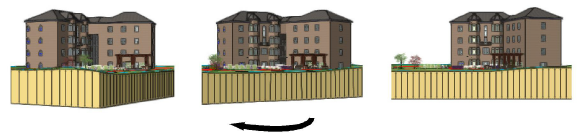
The orbit animation path creates an animation that moves in a circular path at the same elevation around specific 3D objects or points, with cameras that point to the center of rotation. This animation command is typically used to create an orbit around a large object, such as a building model. See Creating an orbit animation with a custom elevation to create the animation path at a different height from the working plane or the 3D objects being rotated. See Creating a spin animation to create an animation around a smaller object, such as furniture or a machine part.
To create an orbit animation:
If you want to orbit specific objects rather than the center of the active layer plane or working plane, select the objects to set the center of rotation.
Select the command.
The Orbit Options dialog box opens.
Click to show/hide the parameters.Click to show/hide the parameters.
|
Parameter |
Description |
|
Orthogonal Projection |
Creates an orbit path in orthogonal projections; the resulting Orthographic Orbit path type cannot be edited or previewed from the Object Info palette. Deselect to create a Fly Freely path type, which can be edited. See Types of animation path objects for information about path types. Reshaping an Orthogonal Orbit type path converts it into a Fly Freely type. |
|
Rotation angle |
Specifies the amount of rotation (in degrees) for the animation; for example, to complete an orbit around the selected center of animation, enter 360 |
|
Rotate about center of |
|
|
Active Layer Plane |
Specifies the center of the active layer plane (0X, 0Y, 0Z) as the center of rotation for the animation |
|
Working Plane |
Specifies the center of the working plane (0I, 0J, 0K) as the center of rotation for the animation. Set the working plane location before creating the animation. |
|
Selection |
Specifies the center of the selected object as the center of rotation for the animation |
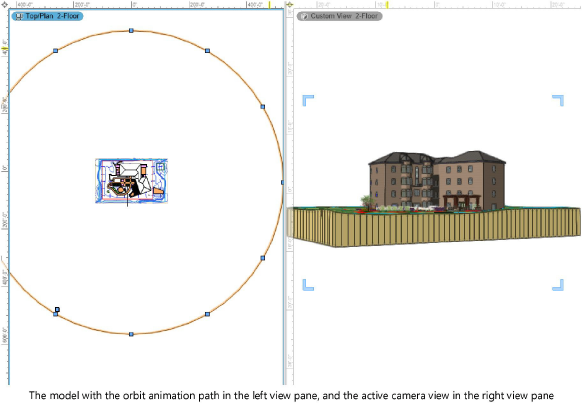
An Orthogonal Orbit type or Fly Freely type animation path is created on the active design layer. Keyframes are automatically placed around the path, and a triangular shape that indicates the camera view displays at the beginning of the path. See Editing animations to reshape the animation path, fine tune the camera’s views, and adjust the speed along the path.
Creating an orbit animation with a custom elevation
To create an orbit animation path at a different elevation from the objects being displayed:
Create a new design layer for the animation path, set its Elevation to the designed height, and set it to be the active layer.
With Layer Options set to Show/Snap/Modify Others, click the object to be rotated, selecting it.
Select Model > Create Animation > Create Orbit Path.
In the Orbit Options dialog box, deselect Orthogonal Projection so the path can be previewed and edited, and select Rotate about center of Active Layer Plane.
The animation path is created at the elevation of the active layer plane.
